google-site-verification: google70410e9e92d4fda2.html

Tuesday 30 September 2014

Stamp Set Showcase Week 12 (3)

VISIONS OF SANTA
DAY THREE

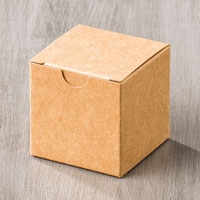
Todays blogpost is using another of  Stampin Up's Kraft gift boxes
This time it is the turn of  the 
9cm x 9cms x 6.4cms Kraft Box


As you can see, this box doesn't look like a Kraft Box does it? ... well maybe you can see a teeny amount of the box  at the corners
But I couldn't resist the fairisle paper from the 
Trim The Tree Designer Series Paper Stack
It reminds me of knitting fairisle jumpers for myself & my family when I was a young Mum with 2 sons. It was my way of passing the time as I sat on the train commuting to and from London.
I used to knit because if I started reading, I just fell asleep and I never wanted to be one of those dribbling sleepy commuters, falling in the lap of others!
It may be 30 years later, but I bet nothing has changed on the commuting train he he


Anyway, the Kraft boxes come in packs of 4, working out at less than £1 per box - so much cheaper than buying gift boxes from the shops, and this way you get to personalise them your way, and with flair!
Full instructions come with the boxes, but they are easy to put together as they come flat packed and as one piece (basically a fold flat box).
Even if, like me, you like to make gift boxes, we are limited by the restriction of making boxes from 12" x 12" cardstock. So this way you can go large

To decorate your box you need to cut the following pieces of DSP:

1 of 9cms x 9cms
4 of  9cms x 6.5cms

I attach the DSP to the boxes using teeny amounts of Tombow Glue, but the new Fast Fuse adhesive would also be a good and permanent alternative


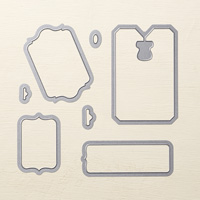
For the tag, I used the Chalk Talk framelits. The large tag has been die but, and then dry embossed using the Festive Flurry Textured Impressions Embossing Folder (TIEF) using Old Olive cardstock
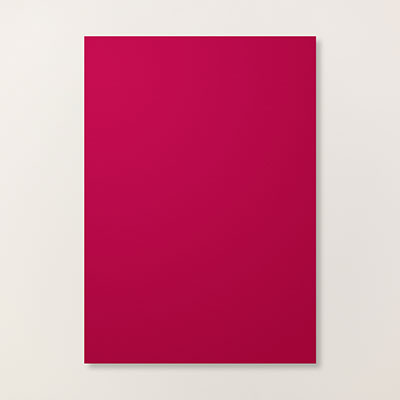
I stamped the jolly Santa in black Stazon ink onto Real Red cardstock.
The white outline and santa kisses were drawn freehand using the white uniball gel pen.
Santa's eyebrows, bears and cuffs were given the same treatment.
This tag was then die cut using one of the smaller dies in the Chalk Talk framelits pack.
This was then layered onto the larger tag using Stampin Dimensionals
The tag was then attached to the box using a piece of 5/8" Whisper White Organza Ribbon

And that is one perfect little gift box ready and waiting for you to fill it full of goodies for the little ones in your life ...


If you have any questions on techniques, orders, products etc., please ask away by adding comments below, or you can contact me via:-

Email:       kim@stampinupatthewarren.com
Telephone/Text:07759587004
OR


Monday 29 September 2014

Stamp Set Showcase Week 12 (2)

VISIONS OF SANTA 
DAY TWO

This jolly little card is a really quick make, but to me, santa looks more like he is skating on ice rather than dancing he he
The card combines rubber stamping, die cutting and dry embossing
And here is the 'how to ...'


Begin Make your card blank by trimming a piece of Whisper White cardstock to 21cms x 14.8cms
Score the long side at 10.5cms. Fold the core line and burnish with your bone folder to create a nice crisp fold.

Next, you are going to stamp directly onto your card blank (front only).
Begin with the Candy Canes, stamping them randomly in Cherry Cobbler ink.
Then randomly stamp the mistletoe stamp in Old Olive ink, over the card front.

Stamp the Dancing/skating Santa using Black Memento ink onto Whisper White cardstock
Colour in the Santa using the Cherry Cobbler Blendabilities assortment.
Then outline the santa using the Coastal Cabana assortment, and paint the ice/snow in the same colour
Die cut the Santa using the Oval Framelits collection
die cut the next size up oval framelit in Cherry Cobbler cardstock
Dry emboss the Cherry Cobbler die cut using the Tiny Triangles embossing folderTrim 2 pieces of Designer Series Paper in two contrasting papers from the Trim The Tree Paper Stack

Piece 1: 14.8cms x 2cms
Piece 2: 14.8cms x 1cm

Layer one on top of the other, and adhere to the card blank, across the middle of the card front.
Attach the die cut ovals to the card front (left hand third) using Stampin Dimensionals;
Stamp the 'Naughty, Nice, Fantabulous' stamp onto Whisper White cardstock using Black Memento ink.
Punch out the sentiment using the large Oval punch.
Layer this onto another piece of paper from the paper stack, cie cut using the Scallop Oval punch,
Use Stampin Dimensionals to layer up the sentiment and attach to the card front.
And that is it! Simples huh??


If you have any questions on techniques, orders, products etc., please ask away by adding comments below, or you can contact me via:-

Email:       kim@stampinupatthewarren.com
Telephone/Text:07759587004
OR
Order Online 24/7 @ http://www.stampinupatthewarren.stampinup.net

Alternatively, you can click on the images of the products used below, and it will take you straight through to my online store


Sunday 28 September 2014

Stamp Set Showcase Week 12 (1)

Wellcome to the New Stamp Set Showcase and this week it is a week for the Kids, big, small and never aging Kids everywhere
So this week is all about 
VISIONS OF SANTA
There is 4 gift box ideas and 3 cards
And the many positions of a dancing, prancing, exercising santa!

Todays project begins with one of Stampin Up's newest Kraft  Boxes
the  Tiny Treat Boxes


these fab little boxes are perfect for making Valentines treats or dressing up for that extra special if teeny gift .... you know the ones I means? The Girls Best friend kind of gifts he he

But today I have stamped the boxes with each of the Santa's and the reindeer dancing Santa using Cherry Cobbler Ink
The background snowflakes were stamped in metalic Gold Encore ink
The White stars are free hand drawn using a White uni ball Gel Pen
And Santa's hair, beard & cuffs have been given the same treatment  with the Gel pen, as have the Reindeer'santlers.
I felt it was in keeping with their nordic styling.
Remember to stamp the box whilst it is still flat packed, otherwise the job is much harder.

Next I stamped the Naughty, Nice, Fabulous stamp onto Whisper White cardstock using Black Stazon ink
Pinch the sentiment out using the Large Oval Punch, add a couple of mini silver brads and then using Stampin Dimensionals, layered onto Cherry Cobbler Cardstock, die cut using the Scallop Oval punch. 
Wrap around a piece of 1/8" Real Red Taffeta ribon, & tie a bow.
Attach the label to the box using Stampin dimensionals


 If you have any questions on techniques, orders, products etc., please ask away by adding comments below, or you can contact me via:-

Email:       kim@stampinupatthewarren.com
Telephone/Text:07759587004
OR
Order Online 24/7 @ http://www.stampinupatthewarren.stampinup.net
Alternatively, click on the images of the product list below, and it will take you straight to my online store
Table built using Product Table Builder by The Crafty Owl - Independent Stampin' Up! Demonstrator.