
Yesterday you had the tutorial on the gift tag that is attached to todays project
And today we are talking Gift Box Punch Board (GBPB)
But it wouldn't be me without some stamping now would it?
Now, before I start the tutorial, if like me, you have struggled getting to grips with the Envelope Punch board, I can assure you that the Gift Box Punch Board is a much easier beast to fathom.
I have had great fun making boxes with the GBPB.

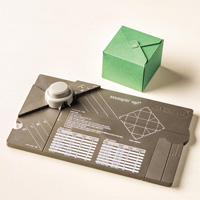
The GBPB has a fold out extension for the scoring of up to 12" cardstock. (see below)
Begin by trimming a piece of Whisper White Cardstock to 9" square.
Randomly stamp the cardstock using Island Indigo ink and the Flowering Flourishes stamp set.
Because the ink is so intense, you can get 1at, 2nd, & 3rd generation stamping to create tonal changes on the project.
This just means that you can stamp an image 3 times before re-inking the stamp.

Now to build the box. The amazing thing, is that once you have trimmed the cardstock to size, it is simply a matter of scoring, punching and folding.
The GBPB has a legend for the size of cardstock you are using, and tells you where on the punch board you have to line up and score the cardstock.


And so if you look at the image above, you can see that you line up the cardstock for a 9" square, with the Large Start Line and Large Scoring Line.
Place your cardstock in line with the ' L' start line & Punch.
You then have 3 score lines to score,
The first goes from the punch down on the vertical line, then from the punch and along the extension plate on the horizontal.

Finally, you will see a further scoring line at the top of the board, and you want to score along the 'L' line again, but only as far as the fist score line you get to.
Rotate the cardstock by 90 degrees and repeat. Then repeat until you have punched and scored all four sides.
That is the hardest bit done.
Now flip the cardstock over onto it's belly and you need to punch where the sore lines match up with the punch opening on all 4 sides,
Finally, there is another little punch on the back of the main punch. Insert each corner into this little punch in turn, and punch. This will create little 'hooks' that allows the box to be self closing.

Now, I am sure you will all have made those little paper puzzles where you wrote numbers on the outside and little messages or 'Dares' on the inside flaps?? Yes??
Well that is harder than the folding you have to do to fold this box up. All the folds are Mountain folds EXCEPT where those short little score lines are, and those are Valley folds.
You do need to burnish the folds or the box fights it's little self closing mechanism, you can use your fingernail, but I prefer using a Bone Folder as it gives a nice crisp edge and the point can get right down into the corners.
I finished this box with a couple of ribbons, attached to one another and also onto the top of the box with Mini Glue Dots, and topped off the smallest bow with a basic rhinestone.
Tie on the tag you made yesterday and you have another of your Christmas Gifts wrapped!

If you would like
to ask any questions on techniques or products, or anything else related to my
blog posts, please feel free to ask away
Happy Stamping
Kim xxx
Contact me to order:
Telephone/Txt:
07759587004
Email: kim@stampinupatthewarren.com
Or Order
Online 24/7
Or Click on the
image of the products used below and it will take you straight to my online
store
 |  |  |  |  |
 |  |  |  |
Table built using Product Table Builder by The Crafty Owl - Independent Stampin' Up! Demonstrator.


No comments:
Post a Comment