
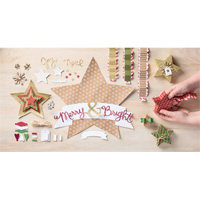
Today I have another triple set for you today.
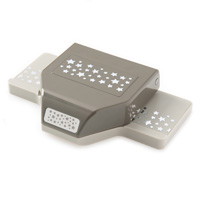
I decided it was time to use the Stars Confetti Punch I purchased a while ago and it feature in all three of todays cards/tag
|And I must not forget todays little Simply Star Box
I have used Lovely as a Tree stamp Set for the Tag and A6 card, and the 25 Days stamp set for the A7 card to keep the Advent Countdown going
The seasonal Greetings comes from the Endless Wishes stamp set

Begin with the smallest but by no means insignificant little beauty, this is a super fast make,
Create an A7 card blank using Bermuda Bay cardstock
Trim a 5 cm strip of Whisper White Cardstock and punch with the Confetti Stars Punch. Trim tot he width of the card and adhere using a little Tombow Multi-Purpose Glue
Stamp your sentiment (or number) and punch out using the Word Window Punch. Shorten the tag using the Banner Punch by inserting it through the top of the punch and between the cutting plate. Repeat this with the opposite end. Attach to the card using mini Glue Dots.
These would look great as name place cards for your festive table

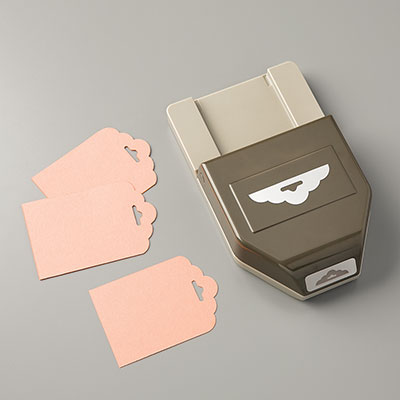
Now for the tag
Create your tag by trimming a piece of Bermuda Bay cardstock to 5 cms x 9 cms
Punch one short end with the Angled Tap Topper Punch.
Now trim a piece of Whisper White Cardstock to 4.5 cms x 8.5 cms
Punch one short end of this with the Angled Tag Topper Punch also
Next, Stamp the 4 trees stamp to the upper portion of the tag using Smokey Slate ink
Then ink up the Conifer Stamp from Lovely as a Tree using Versamark, and before stamping, ink the stamp again with Bermuda Bay ink.
Stamp in the centre of the card , dust with Clear Embossing Powder, and heat set with a Heat Tool.
Use the same technique when stamping the sentiment straight onto the cardstock.
Next, punch one side of the Whisper White cardstock with the Confetti Stars Punch.
Attach to the Bermuda Bay Tag using small amounts of Tombow Multi-Purpose Liquid Glue
Add a splash of Basic Rhinestones and some 5/8" Silver Satin Ribbon and you're all done with the tag ...

Last but not least is the A6 card. This is made exactly the same as the Tag, but you will want to punch the Confetti Stars Punch on each side of the cardstock but in an asymmetrical way.
You need a Bermuda Bay A6 Card Blank by trimming the cardstock to 29.6 cms x 10.5 cms. Score the long side at 10.5 cms, fold and burnish with your bone folder,
Round all corners (short edges) with the corner punch
Next, trim a piece of Whisper White cardstock to 14.3 cms x 10 cms. Use the corner punch to round the two bottom corners of the cardstock (the short edges).
Enjoy creating your own versions of this card, and don't forget ti bling it up with those rhinestones
If you would like
to ask any questions on techniques or products, or anything else related to my
blog posts, please feel free to ask away
Happy Stamping
Kim xxx
Contact me to order:
Telephone/Txt:
07759587004
Email: kim@stampinupatthewarren.com
Or Order
Online 24/7
Or Click on the
image of the products used below and it will take you straight to my online
store
 |  |  |  |  |
 |  |  |  |  |
 |  |  |  |  |
 |  |  |  |  |
Table built using Product Table Builder by The Crafty Owl - Independent Stampin' Up! Demonstrator.


No comments:
Post a Comment