
Before I start my blogpost for today, I must share with you a magical moment!
We recently helped my grandchildren to write their Christmas Lists to Santa, and today they received a card and letter from Santa.
Well our 4 year old granddaughter just loved the pictures but otherwise it all went a little over her head,
BUT our 7 year old grandson, who has worked really hard on his reading this year, read every word that Santa wrote to him. The delight on his face was just so wonderful, and so thrilled that Santa was going to find his way to us for Christmas Day.
The Royal Mail get a bad rep in general, but the Santa's Letter service, which is free, that they provide for young children each year is just amazing!
But otherwise we have had a frustrating Day today has been! Why? Well we have been unable to access the internet almost all day, that means no blogs prepared in advance, completely behind on all my work, but at least I was able to get into the workshop to make this cute little treat box.
I also managed to make a gift tag ready for tomorrows blog, so that will get photographed following tomorrows workshop and will be on the blog the following day ... at least that is the plan, providing the internet behaves itself!
And as I am using Cherry Cobbler and Gold inks for todays Tag Topper Box, it seemed only right to show off one of the Simply Stars Boxes. and this one did the job just nicely.
I just realised that I missed out the photo of todays Advent Countdown !! Tut Tut!! I will see if I can resolve that missing little number ... I bet the elves have been hiding things again.

Now, I have seen quite a few plans for Tag Topper Boxes, but I decided to have a play around myself as I like a box to shut if I want the element of surprise of 'oh what's in the wee little box?;
So here is the plan I came up with,

Begin by trimming a piece of Kraft Cardstock to 24cms x 19 cms
Randomly stamp the cardstock with the ENDLESS WISHES stamp set using Cherry Cobbler & Gold Encore inks
Get out your Scoring Tool with the Metric Plate.
With the long side of the cardstock at the top of the scoring board, score at 4 cms, 9 cms, 13 cms & 18 cms
Rotate the Cardstock by 90 degrees and score the short side (at the top) at 5 cms & 10 cms

Trim to the 1st score line on the long side. Rotate by 180 degrees and repeat with the other long side. Where the small tab at the end is, you need to trim away the little bit at the top and the bottom (see the photo's above and below.
Apply Sticky Strip tp the outside edge of the small end tab (see above)
Turn the cardstock over and apply Sticky Strip to one of the 5 cms tabs on the bottom edge (the will secure the underside of the box).

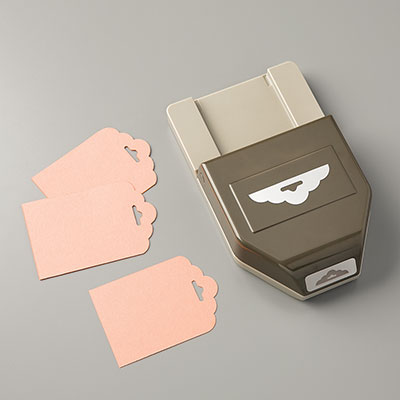
Next, you need to get your Scallop Tag Topper Punch out and I felt it easier to hold down the two 4cm tabs whilst I inserted the tag topper punch. Punch both of the 5cm tabs on the top edge.
Now you need to fold the box up. The boxes can be stored as fold flat boxes providing you do not seal the underside of the box.
What is great about this little box is that the two 4 cm tabs on the top edge of the box, fold intot he middle, creating that hidden compartment.
Thread some luxurious ribbon through the tag tops and tie a knot or bow to seal the box and make it look sooo cute.

I finished the box by stamping the sentiment onto Whisper White cardstock, but I have since stamped the sentiments onto Very Vanilla cardstock, and that looks much nicer. I used Cherry Cobbler ink to stamp the sentiment for that co-ordinated look. The Sentiments were punched out using either the Modern Label Punch or the Ticket Duo Punch.
I hope you have enjoyed todays project and look forward to seeing your own creations.
If you would like
to ask any questions on techniques or products, or anything else related to my
blog posts, please feel free to ask away
Happy Stamping
Kim xxx
Contact me to order:
Telephone/Txt:
07759587004
Email: kim@stampinupatthewarren.com
Or Order
Online 24/7
Or Click on the
image of the products used below and it will take you straight to my online
store
 |  |  |  |  |
 |  |  |  |  |
 |  |  |  |  |
 |
Table built using Product Table Builder by The Crafty Owl - Independent Stampin' Up! Demonstrator.


No comments:
Post a Comment