
Today is the Best Day Ever
Why? Well on Valentines Day, My hubby decided today was the day for re-organising the Rabbitry to ensure all the rabbits are in just one place (they are currently in 4 different zones at our home. And yes, I did say All! We Breed and Show Rabbits, Guinea Pigs and later this year, Pygmy Goats when the girls become of age!
Imagine the scene ... I'm disabled (spinal injury) and my middle aged hubby was huffing, puffing, heaving and ho'ing all the heavy animal housing (rabbits still in them)
Whilst I directed, suggested, and just looked at him and felt like I am the most Lucky Lady in the World to have found my Soulmate 22 years ago!
Anyway, back to the the blog lol
Todays card is a super quick card make with the use of Washi Tape and a Designer Paper Stack
As usual, here is your product list for todays card;
Stamp Set:
Best Day Ever:
Cardstock:
Whisper White
Ink Pad:
Versamark
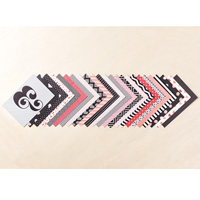
Designer Series Paper (DSP):
Stacked with Love DSP Stack
Washi Tape:
Stacked With Love Designer Washi Tape
Accessories:
Artisan embellishment Kit
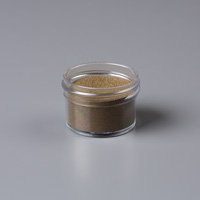
Gold Embossing Powder
Linen Thread
Adhesives:
Stampin Dimensionals
Glue Dots
Tools:
Big Shot
Labels Framelits
Heat Tool

Begin by trimming a piece of Whisper White Cardstock to 14.3 x 10 cms
Using the Black Diagonal Washi Tape in the pack, create 2 vertical parallel lines. Make sure you allow some extra length of Washi Tape so you can turn it onto the back of the card front for a cleaner finish.
Then make one horizontal line using the teeny gold heart on white Washi Tape, finishing as before.
Apply Stampin Dimensionals to the reverse side of the panel and attach to the front of a white A6 card blank.

Next, stamp the Best Day Ever stamp onto some Whisper White cardstock using Versamark Ink
Sprinkle with Gold Embossing Powder & heat set with your Heat Tool
Die cut the sentiment using the best fitting Labels Framelit
Then select the DSP of your choice from the Paper Stack and die cut another Label with the next size up framelit.
Apply Stampin Dimensionals to the reverse side of both labels, Layer them up and attach them the the card front.
Finish the card with a couple of the embellishments from the Artisan Embellishment Kit
Thread one of the silver buttons with Linen thread. Attach the embellishments using Glue Dots.
And there you have it, a fab card in less than 15 minutes!

If you would like to join my Pinterest community board where you will be able to post your own Stampin Up creations. Simply email me and I will add you to the board
kim@stampinupatthewarren.com
If you would like to ask any questions on techniques or products, or anything else related to my blog posts, please feel free to ask away
Happy Stamping
Kim xxx
Contact me to order:
Telephone/Txt: 07759587004
Email: kim@stampinupatthewarren.com
Or Order Online 24/7
Or Click on the image of the products used below and it will take you straight to my online store
 |  |  |  |  |
 |  |  |  |  |
 |  |  |  |  |
 |
Table built using Product Table Builder by The Crafty Owl - Independent Stampin' Up! Demonstrator.


No comments:
Post a Comment