
Cheers To Love
is todays Stamp set for this lovely aperture card using an ombre technique with the assistance of Sale A Bration Freebie (with every qualifying £45 order) Irresistibly Yours Specialty Designer Papers
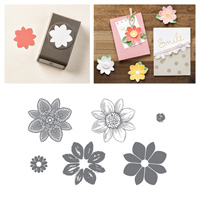
This stamp set is perfect for those of you looking for a Homemade Wedding, including invitations, congratulations cards & my favourite ... Happily Ever After which is part of the stamp I have used on today's card.
I have used Blushing Bride ink, but you can tailor the colour, to that chosen by the Bride and Groom.
But you are going to have to be fast, as Sale A Bration ends 32 March 2015 at which point, this wonderful Emboss Resist paper pack will be no longer available!

Begin by sponging the cardstock. there is a variety of emboss resist papers in the pack, so chose your favourite. Begin sponging from the bottom up, using circular motions, bleeding the colour out as you go up the sheet. You can keep it subtle, or keep building on the ink by sponging over repeatedly without causing the surface of the cardstock to bobble. Once you are happy with the tonal finish, wipe over the paper with a piece of kitchen towel to remove any residual ink on the resist part of the paper.

Next, turn the paper over and draw a cross on the back to allow you to align the Oval Framelit (measure up the framelit against the Stamp for the best size. And Die Cut a central Oval. Best results are gained using the Magnetic Platform to hole your die and cardstock in place during die cutting.
Do not dispose with the Oval you die cut, as you are going to replace this in a moment.
Stamp your sentiment onto White Vellum cardstock using Black Stazon ink (fast drying), but you could also heat emboss the sentiment if you prefer.
Once dry, die cut the sentiment out using the next soze up Oval Framelit.
There is two ways of adhering the sentiment panel to the Aperture.
The first is to use the outside narrow border from your Stampin Dimensionals packs and mold them around the curves of the Oval to the back of the emboss resist paper. Alternatively, Stampin Up have Shaker Frames you can purchase, (basically longer, narrower rounds of the Stampin Dimensionals), and work these around the aperture.
Next is a bot of Heat Embossing onto Vellum usng the lacy flower stamp in Petal Potpourri Stamp Set. Use Ink up the stamp with Versamark Ink and stamp into White Vellum. Dust with White Embossing Powder and shake off the excess. Heat set using a Heat Tool. Punch out the flowers using the Medallion Flower Punch. You want 3 flowers, each cut in half. Adhere these in two places around the oval (see photo's) using Glue Dots.
Turn the panel over so you have the back of the paper facing you, and replace the doe cut Oval on top of the Vellum and use a little tape to adhere in place, Attach Stamping Dimensionals in each corner, turn the panel over and attach to your White Card Blank.
Finish by adding a Something Borrowed Embellishment in top of each Glower.
And there you have it. A Card for every Bride to love!


If you
would like to join my Pinterest community board where you will be able to post
your own Stampin Up creations. Simply email me and I will add you to the board
kim@stampinupatthewarren.com
If you would like
to ask any questions on techniques or products, or anything else related to my
blog posts, please feel free to ask away
Happy Stamping
Kim xxx
Contact me to
order:
Telephone/Txt:
07759587004
Email: kim@stampinupatthewarren.com
Or Order
Online 24/7
Or Click on the
image of the products used below and it will take you straight to my online
store
 |  |  |  |  |
 |  |  |  |  |
 |  |  |  |  |
 |  | 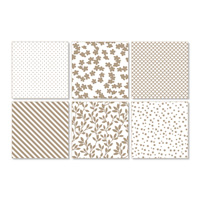 |  |
Table built using Product Table Builder by The Crafty Owl - Independent Stampin' Up! Demonstrator.
No comments:
Post a Comment