
I am hoping you will have a go at making today's 3D seasonal card
It is a box card (not to be confused by a card in a box, this is different to that)
This is a card that requires some scoring, but the concertina folds at either side of the card allows for the card to go into a standard 5" square envelope, and when it is received and removed from the envelope, those concertina folds allow the card to stand on a shelf, table etc.
I used my Scoring Tool and Metric Scoring Board (complete with stylus) to make mine. But if you do not have one of these tools, but do have a Stamping Trimmer, then you can used the scoring blade on that.
The inside of the card has been stamped with versamark using the Happy Scenes Stamp Set and embossed with White Embossing Powder then sponged with a combination of blue inks to create the nightscape in the background.
The Love;ly as a Tree stamp Set was used to create the Christmas Tree in the window of the 'Home'. This was stamped using Mossy Meadow Classic Ink Pad onto Old Olive Cardstock and cut out by hand. This was then mounted behind the window using a few Stampin Dimensionals, after being decorated with Gold Cording Trim and Basic Pearls.
The Shopping List and Tutorial can be found further down today's blog post
Feel free to CASE away
(Copy & Paste Everything)

Below is the shopping list of the products used in today's card.
Click on the product icons to view them in more detail, and/or place an order.
 |  |  |  |  |
 |  |  |  |  |
 |  |  |  |  |
 |  |  |  |  |
 |  |  |  |  |
 |  |  |  |  |
 |
Table built using Product Table Builder by The Crafty Owl - Independent Stampin' Up! Demonstrator.

- Trim an A4 sheet of Thicker Whisper White Cardstock to 14.8 cms x 25 cms
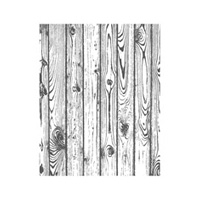
- Stamp just one side of the cardstock with the Hardwood Background Stamp using Soft Suede Classic Ink Pad & &then sponge the cardstock using a wedge of a Stampin Sponge and Sahara Sand Classic Ink Pad.
- Score the longer side at the following 1,2, 3, 13, 14, 15 cms, fold and into valley and mountain folds and score the folds using a bone folder
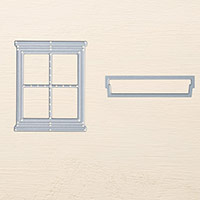
- Die Cut the Window Frame using your Big Shot, with the Magnetic Platform in situ, using Smokey Slate Cardstock & the Hearth & Home Framelits Dies.
- Draw a Cross (X) using a pencil
- Measure the window frame from the inside edges and (top to &bottom and side to side. Mark up this width and height on the back of your card front using the X lines to keep the aperture central. Use your Stampin Trimmer or a safety blade and steel rule to cut out the aperture.
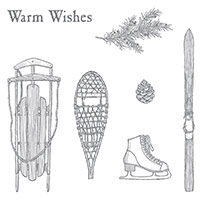
- Using Mossy Mossy Meadow Classic Ink Pad and the conifer leaf from the Winter Wishes Stamp Set, stamp some conifer leaves around the aperture
- Apply some Fast Fuse Adhesive or Tear & Tape Adhesive to the back of the window frame and adhere to the front of the aperture.
- Open the front of the card (as if opening a book so you can see the back page) and you are now going to work on making the background scenery that will be seen once the card is fully assembled.
- Stamp the Conifer Stamp from Happy Scenes Stamp Set a couple of times using Versamark Ink Pad, Dust with White Embossing Powder and heat set with your Heat Tool
- Next is the sponging, you will need to start at the bottom using the Lost Lagoon Classic Ink Pad, then into Island Indigo in the middle section, an finally Night of Navy for the top selection.Do not be temped to overload the ink sponge with ink, as that will create unsightly lines. You want to work gently in small circles, that become larger circles as the blend the ink out, and you also want to blend the 3 colours so the back of sky has an ombre effect. Build the colour slowly in layers. You can also draw the eye to certain details by adding extra colour under the snow drifts, or one side of a tree etc.
- Now for the Christmas Tree. Stamp the Tree from Lovely As A Tree Stamp Set using Mossy Meadow Classic Ink Pad, onto Old Olive Cardstock.. Using your Paper Snips cut the tree out, but do not trim off the cardstock underneath the bottom of the ree as this is what you are going to use to adhere the tree behind your window. Get an idea of where you want the tree to be. Leave enough cardstock to attach a couple of Stampin Dimensionals to the bottom of the inside front of the card (this adds additional depth to the card), and once you know where you are placing the tree, you can snip off any excess card. DO NOT STICK THE TREE ONTO THE CARD YET
- Add some tiny Basic Pearls where the 'baubles' are on the tree, and wrap some Gold cording Trim to give the impression of tinsel. Now you can stick your Christmas Tree to the inside front of the card.
- Attach some Tape & Tear Adhesive to the tab on the Z fold, to adhere the card shut
- Attach some Gold Cording Trim behind one of the Snowflake Elements and adhere to the lower left of the card front, and another Snowflake Element to the top right of the card front.
- Add a metal rimmed Pearl to the centre of each Snowflake Element
- Finish by stamping your sentiment onto Whisper White Cardstock using Soft Suede Classic Ink Pad, punch it out using the Large Oval Punch and layer that onto the Scallop Oval Punch (I used a piece of the cardstock cut out from the Aperture).
And that is it ... I know this tutorial is rather lengthy, but sometimes you want to go that extra mile for people you love and care about, hey?
Now it is your turn to have a bit of fun ...

Join my Pinterest community board,
Where you can share your own Stampin Up Creations?
Follow the Pinterest Board on the left hand side
bar and I will send you an invitation to follow the Stampin Up! At The Warren
Community Pinterest Board
If you have any
questions on techniques or products, or Joining my Team/discussing the business
opportunities Stampin Up! Can offer
Contact Me
Or telephone/text
07759587004
Happy Stamping
Kim
xxx
Order your Craft
Supplies on line 24/7
http://www.stampinup.net/esuite/home/stampinupatthewarren/
No comments:
Post a Comment