
Happy Sunday Morning'ish to you!
I hope you are all finding some time to relax.
But if you are like me, and get itchy palms if I have nothing to keep them occupies whilst vegging on the sofa, then the card I am sharing with you today, would be perfect for the task of getting those itchy palms under control.
And what is more, is that you can get 4 cards from 2 sheets of cardstock & 3 sheets of Designer Series Papers (DSP) with plenty of left overs, that you could use on another project.
Please feel free to Copy & Paste Everything (CASE) as you chose.
If you would like to share my blogpost(s) ... I thank you in advance.

Keep scrolling down for the tutorial
And to help you out with ordering, simply click on the product icons below to view the item in my online store


r.
|

- Begin by choosing one of the white Colour Me Irresistible Designer Series Paper (DSP) to 14 cms x 14 cms.
- Mat (layer) this panel onto a piece of Real Red Cardstock measuring 14.4 cms x 14.4 cms
- Trim a piece of Whisper White Cardstock to 12.4 cms x 12.4 cms
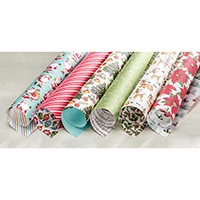
- Trim TWO pieces of the Mistletoe Designer Series Paper to 12cms x 12cms& cut these in half on the diagonal. Using a small amount of Tombow Multipurpose Liquid Glue and adhere a triangle into each corner of the Whisper White Panel, leaving a 1-2mm border around the edge
- Trim a piece othe Bauble DSP AND a piece of the Music Score DSP to 12 cms x 12 cms and cut each square into 4 pieces on the diagonal. Adhere these making your own pattern in the centre of the card, again, leaving that very thin border of white cardstock.
- Apply stampin Dimensionals to the back of the panel, and mount onto your card front on the .diagonal
- Stamp the Filled with Wonder Stamp from A Flurry of Wishes Stamp Set, and stamp it onto a scrap of Whisper White Cardstock using Night of Navy Classic Ink Pad.. Trim the panel and mat onto a piece of Gold Foiled Cardstock; apply Stampin Dimensionals to the back of the sentiment panel, and adhere to the front of your card.
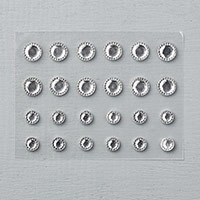
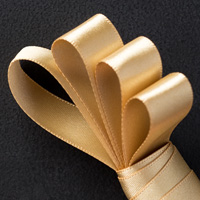
- Finish by adding some Frosted Rhinestones and a Gold Satin Bow & mount onto a 6" Square Card Blank

JOIN my Pinterest Community Board
Where you will be able to post your own
Stampin Up! Makes
Simply follow my
Community Pinterest Board
(See the left hand side
bar of this Blog)
And I will sent you
an invitation to start pinning
If you have any
questions on techniques, orders, products
OR
Joining my Team as an Independent Stampin
Up! Demonstrator
contact me via:-
Email me: kim@stampinupatthewarren.com
Text: 07759587004
Order Online 24/7
No comments:
Post a Comment