
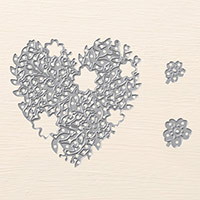
Today I have another variation of the Bloomin Hearts Thinlets Dies from Stampin Up!
This time I have made the card for the Newlyweds ... using the sentiment from the all round stamp set TEENY TINY SENTIMENTS.
But the main reason for today's post, is to share with you the results of playing with these super intricate Dies. I tried different combinations of the 'sandwich' I used for my Big Shot Die-cutting machine, but also the Cardstock I used.
And here is the results .... Drum Roll Please ....
The best cardstock to use for this die cut was either the Thicker Whisper White Cardstock, OR the Shimmery White Cardstock. I believe the results of this is because these two card stocks are slightly denser and thicker than most, giving a crisper, cleaner cut
The sandwich that gave the best results can as a surprise as I expected either the Magnetic Platform or the Precision Plate to come out on top, but it wasn't, it was the Multi-Purpose Platform. As my Big Shot is very well used, I also added a couple of Shims ... but even sow I was surprised.
And I think that the white Die Cut onto a coloured cardstock creates a really striking effect, and even better, is this way you can colour co-ordinate the Invitations or Newlyweds cards to the wedding colour scheme .... and I will be playing around with colour comb's for Valentines Cards .... my thoughts are initially Basic Grey, Basic Black, Cherry Cobbler or Real Red as the base colour ... let me know what you think?
And remember, Start Following My Community Board on Pinterest, and once you accept an invitation to join, you can start pinning your own card makes!

- As you scroll down today's
blog post, you will find :
- icons of all the products
used to create today's card - click on them to visit my online store;
- A Video Tutorial
- & a typed tutorial
Feel free to CASE any of my creative
projects (Copy & Paste Everything)
Click on the icons below to view/order
any of the products used in today's tutorial


Watch the Video Below
Tutorial
1. Trim a piece of
Thicker Whisper Cardstock to 21 x 14.8 cms; Score the long side at 10.5 cms; fold & Burnish with a bone folder
2. Trim a piece of Whisper White Cardstock to 14.4 x 10.1 cms; adhere to your Card Base
3. Die cut a Bloomin Heart & the 2 smaller flower dies using Shimmery White Cardstock using the following Sandwich with your Big Shot:
2. Trim a piece of Whisper White Cardstock to 14.4 x 10.1 cms; adhere to your Card Base
3. Die cut a Bloomin Heart & the 2 smaller flower dies using Shimmery White Cardstock using the following Sandwich with your Big Shot:
Multi-Purpose Platform on Tab 2
Acrylic Cutting Plate
Cardstock (trimmed roughly to size)
Die (cutting blades face down)
Acrylic Cutting Plate
4. You may need to run through your big shot 4 or 5 times. Check that the cardstock has cut is fully cut before removing the cardstock from the die
5. Add a Stampin Dimensional to the back of the four solid flowers on the die cut, plus on the back of the 2 smaller flower die cuts & attach to your card front.
5. Add a Basic Rhinestone to the centre of the 2 small die cut flowers
6. Trim a piece of Shimmery White Cardstock to 1.5 cms & stamp the Newlyweds sentiment from the Teeny Tiny Sentiments Stamp Set from Stampin Up!
7. Create banner ends for your sentiment label but inserting the card in through the top of the Banner Punch and guide it between the cutting plates of the punch. Adjust the length to suit your stamped sentiment.; Apply Stampin Dimensional stocky fixers to the back of the label and mount onto your card front.

How to Contact or Follow Me
Kim Tolton,
Independent Stampin Up Demonstrator.
Card & Papercraft
Tutorials
Please feel free to
comment below, and ask away with any questions. You can also find me via the
links below
Blog:
Online Store:
Stamping @ The Warren
Craft Forum:
Email:
kim.tolton@googlemail.com
youTube
Pinterest:
Google +
Facebook:
Twittert:
Instagram:
@kim.tolton
LinkedIn:
No comments:
Post a Comment