
Today's card is the is using products from the new 2016 Seasonal (Spring/Summer) Mini Catalogue; and boy is there some corkers in there!
It was SO hard deciding which products I was going to order on my Demonstrator Pre-order.
Yes, as Independent Stampin Up! Demonstrators, we have the privilege of ordering and playing with new products before the mini or annual catalogues go live!
What is the benefit of that? I hear you cry
Well, the benefit is that we have the opportunity to become familiar with new products, and come up with Workshop Ideas before we begin using them live. That way, we are better prepared to answer your questions and showcase techniques. It is a bit like having Homework lol .... only this homework isn't such a chore .... us Demonstrators cannot wait to get our hands on new products!
The good news for you, is that all of Stampin Up! catalogues come packed with creative ideas, and Kits to help you on your own journey of discovery.
- As you scroll down today's blog post, you will find :
- icons of all the products used to create today's card - click on them to visit my online store;
- A Video Tutorial
- & a typed tutorial
Feel free to CASE any of my creative projects (Copy & Paste Everything)

Click on the icons below to view/order any of the products used in today's tutorial
 |  |  |  |  |  |  |  | |
 |  |  |  | 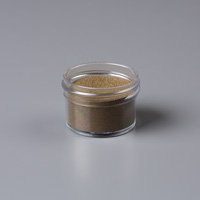 |  |  |  |
Table built using Product Table Builder by The Crafty Owl - Independent Stampin' Up! Demonstrator.
Watch the Video Below
Tutorial
- Trim a piece of Thicker Whisper Cardstock to 21 cms x 14.8 cms; score the long side at 10.5 cms; fold and burnish
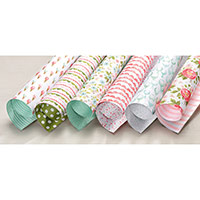
- Trim a piece of Birthday Bouquet Designer Series Paper (DSP) to 14.4 x 10.1 cms; adhere to the card front using Fast Fuse Adhesive or Tombow Liquid Glue
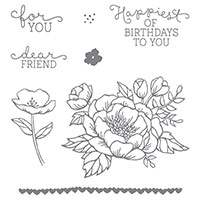
- Trim a piece of regular Whisper White Cardstock to 9 x 7 cms; stamp the large flower from the Birthday Blooms Stamp Set using Versamark Ink; dust with Gold Embossing Powder and heat set using a Heat Tool
- Stamp the Birthday Sentiment using Calypso Coral Classic Ink Pad and punch out using the Decorative Label Punch; stick to the card front using Tombow or Fast Fuse Adhesive
- Using the Banner Punch and a contrasting sheet of DSP from the Birthday Bouquet DSP pack
- Attach the banner to the embossed panel using a Bow Paper Clip
- Apply stampin dimensionals to the back of the embossed panel and adhere on the opposite angle to the sentiment, on your card front

How to Contact or Follow Me
Kim Tolton, Independent Stampin Up
Demonstrator.
Card & Papercraft Tutorials
Please feel free to comment below,
and ask away with any questions. You can also find me via the links below
Blog:
Online Store:
Stamping @ The Warren
Craft Forum:
Email:
youTube
Pinterest:
Google +
Facebook:
Twittert:
Instagram:
@kim.tolton
LinkedIn:
No comments:
Post a Comment